|

How important to a photographer is color management?
It will never be the most exciting job you tackle. But now digital photography is widespread and growing amongst professionals, it is essential - whether we like it or not.
In Cool Kit this edition, we look at some of the best ways color management is carried out. Film poses fewer problems. Color decisions are taken when you choose the speed of your film and what you do later in the labs.
But with digital photography, the devices you use – cameras, monitors and printers – will all handle color differently.
For consistency across your work, your devices should see and process color in the same way. This means calibrating each separately and saving the results as profiles which can be understood across your equipment.
The trouble is expense. Even the cheapest options add up to several hundred dollars. So, it may be best to go for what you can afford and begin with just one of the three jobs below.
Discussing different representations of color – known as “color spaces” - would take a whole website and you can, and should, read more about them elsewhere.
A good start is expert Martin Evening's chapter on color management from his book Adobe PhotoShop CS2 for Photographers. There's a web link to it below.
But in short, professional photographers tend to use two – sRGB and Adobe RGB, which is wider and therefore richer. But it's not necessarily better as some older monitors can only see the more limited range offered by sRGB.
Once you have chosen, you should measure how your devices see colors in that workspace. This is known as creating ICC (International Color Consortium) profiles. Making sure they are the same in your equipment will ensure consistency.
To begin with - and this is the one you should probably adopt if you are short of funds - calibrate your monitor.
First, adjust the color temperature of your monitor, which should be between 5500 and 6500 degrees Kelvin.
Then use a strange piece of hardware that is attached to your screen and looks like a large insect creeping up it – a colorimeter.
Together with software, this will adjust then measure the color characteristics of your monitor to create your profile. Because monitors change as they get older, you will need to re-profile from time to time.
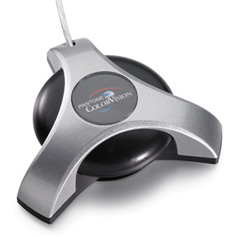
Among the kit used by professionals for these tasks are the Spyder2PRO, the Eye-One Display 2 and the Optix XR Pro. Links to some websites which review, compare and contrast these and other colorimeters appear below. However, all these options cost upwards of $300.
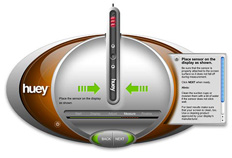
A cheaper alternative could be the new Huey by Pantone which claims to adjust constantly as the light in the room changes and costs less than $100. There are links to reviews below but most describe Huey as for non-professionals.
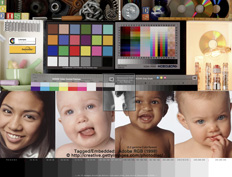
Next comes your camera. First you set it to shoot white and gray properly and then calibrate it with a color chart or card, like the GretagMacbeth ColorChecker. There is a link to a review below. There are plenty of other charts available too.
Finally, to your printer.
In brief, the software that came with your printer should inspect output and make adjustments. Then you need to use a hardware device called a spectrophotometer which measures colors in printouts and produces profiles.
Hardware prices here range from $200 to more than $2000. Reviews of some of these devices and fuller explanations, which can be technical. are linked to below.
Do not despair about cost though. Some packages – like the MonacoEZcolor – handle monitor and printer profiling and, at about $200, might well be worth a look. But cameras will have to be handled separately.
It is worth repeating that for professional work, some color management is highly recommended. But it is not easy or cheap so plenty of real research is recommended before spending.

|